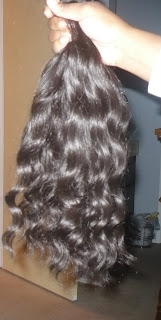
My Latest Beauty Haul & Homemade Clip-In Hair Extensions

I'm going out this weekend for a special event and want to spice things up a bit. Thus, I went to the beauty supply store yesterday and bought the following:
- 1 pack of wavy, synthetic hair on the track ($9.99)
- 3 packs of wig clips (2 per pack for $1.99/pack)
- 1 sewing needle (located inside the gray foil that looks like gum. It cost me $0.99)
- #76 red cherry false eyelashes
I didn't want to spend a lot of money, and am therefore glad that I was able to find hair with the following qualities at a low price:
The hair up close

- Wavy texture (I figured the texture would blend better with my real hair than bone straight hair would)
- Washable (This hair can be washed and re-used)
- Heat resistant (Although this hair isn't human, it can withstand the use of heat-styling tools, at low temperatures of course :-)).
My current color: black with reddish brown highlights in front

The wig clips are what I'll be sewing onto the tracks:

Luckily, the pack of hair came with a spool of weave thread:

Although I purchased a needle used for weaving, I later discovered that I only needed an ordinary sewing needle (which I already had at home), as the weaving needle's head is too large to fit through the holes inside the wig clips.
To create the clip-ins, I simply placed the track up to my head to take two measurements: The width of my head around the occipital bone (lower part of my head) and the width of my head a little below the crown area:
Occipital bone width

Just below the crown width

This is how much hair I had left over. I can therefore make many more tracks with this once I've fried these, LOL!

After cutting the tracks to fit the width of my head, I then started sewing the wig clips on to the track just as you would sew a button on a shirt:
Sewing the clip on the track

Here's a pic of the large knot I had to create at the end of the thread, as the holes in the wig clips are too wide for a standard knot.

I probably could have gotten away with doing just two clips on the track with the shortest width, but I want these suckers to stay on, so I put three on each track for added security!
The finished product

Here's what the clip-ins look like when put into position on the back of my head. Of course it'll look better with my real hair blended in, but this is just so you can see how well I measured the tracks, and what the length of the hair will be like:
My hair up in a messy bun before clipping in the pieces

I plan to curl my hair and the synthetic hair so that it all blends together. I'll post an update Sunday (yes, Sunday) so you can see how it looks with my hair done. Wish me luck!


8 comments:
ummm..yeah!! I would love to see a video on this!!! Pleeeaasseee!!!! Three years ago I was so close to buying extensions and hair clips to make my how clip-on extensions! However I got intimidated!
This is a great post! I have to give it a try because you make it look easy. Can't wait to see the finish product. Good luck!!
that is so freakin cute! i will have to try that sometime, it's way less expensive than buying the clip in extensions pre made...good luck = ]
wow....thats exactly how I used to clip in my extensions when I was relaxed. Everyone used to look at me like I was crazy because I chose not to sew or glue them in.LOL...glad to see someone else does this....can't wait to see how it looks! Good Luck
Yep, thats exactly how I did mine. I still use them everyday. I am transitioning, so the texures and the colors are a little off on the ones i made... (time to make some new ones).. I stuck to straight hair and its looking a bit fried, so maybe I will opt for a wavy sort of texture like yours =) maybe another color for the bottom. (i remember you saying in an old post, that you used clip ins to experiment with color in the past, so instead of dyeing my hair while I am transitiong, maybe I'll invest in some low blond or something =).. cant wait to see your finished product!! hope you look FAB!
Wow! You are so talented! Can't wait to see the finished look! I second a video for this please! LOL!
I've been doing the same thing for years, a hot glue gun is much faster and looks just as good. Great job though.
HELLO... I just have a Few quick questions, when it comes to the Clip in hair peices, when using them , you can put your hair in a ponytail correct without the clips showing? because I am going on a Trip and I wanted to wear, them ALSO I want to get some wavy hair have you tried the extentions in your curly hair? does it Blend well?
Post a Comment